TM 55-2210-223-12
TO 45A2-2-14-41
4-22. FIREMAN'S HEATER ASSEMBLY
This task covers:
a.
Test
b.
Removal
c.
Disassembly
d.
Cleaning
e.
Inspection
f.
Repair
g.
Assembly
h.
Installation
INITIAL SETUP:
Tools
Material/Parts
Tool kit SC4940-97-CL-E16
Dry-cleaning solvent (Item 20, Appendix E)
Electrical tape (Item 23, Appendix E)
TEST
WARNING
· Remove rings, bracelets, wristwatches, and neck
chains before working around the locomotive.
Jewelry can catch on equipment and cause injury,
or may short across an electrical circuit and cause
severe burns or electrical shock.
· High voltage is used in the operation of equipment.
Do not be misled by the term LOW VOLTAGE.
Potentials as low as 50 volts may cause death.
1.
Open electrical equipment cabinet and set battery switch to OPEN. Set #2 heater switch to OFF.
2.
Test switches and breakers for serviceability
prior to disassembly of heater. Make certain
electricity is getting to motor.
REMOVAL
NOTE
Brushes can be inspected, removed,
and replaced without removing or
disassembling the heater. For brush
replacement only, do steps 2, 8, 15,
and 21.
3.
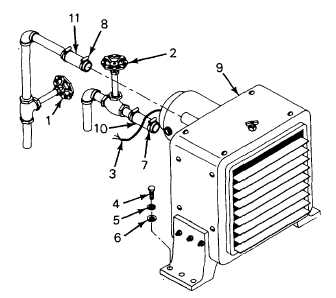
Turn input cutoff valve (1) and output cutoff
valve (2) to OFF.
4.
Tag and disconnect electrical leads (3).
5.
Remove four screws (4), lockwashers (5), and
flat washers (6). Loosen hose clamps (7) and
(8). Remove heater assembly (9) from hoses
(10) and (11).
4-45


