TM 55-2210-223-34
TO 45A2-2-14-22
3-12. BATTERY CHARGING GAGE
This task covers:
a.
Removal
b.
Test
c.
Installation
INITIAL SETUP
Tools
Tool kit SC 4940-97-CL-E12
WARNING
Remove rings, bracelets, wristwatches, and neck chains before working
around the locomotive. Jewelry can catch on equipment and cause injury, or
may short across an electrical circuit and cause severe burns or electrical
shock.
High voltage is used in the operation of equipment. Do not be misled by the
term LOW VOLTAGE. Potentials as low as 50 volts may cause death.
TEST
1.
With engine running, use a multimeter and
check voltage on voltage regulator. Voltage
indicated shall be +74 volts. Replace defective
gage.
2.
Place battery switch in OPEN position.
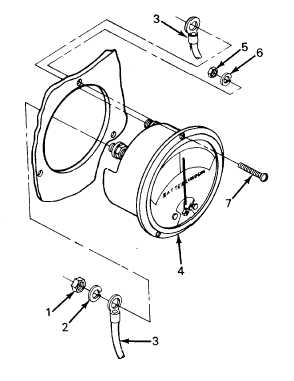
REMOVAL
3.
Tags electrical leads (3) and remove two nuts
(1), lockwashers (2), and electrical leads from
battery charging gage (4).
4.
Remove three nuts (5), lockwashers (6), and
screws (7) and remove battery charging gage
(4).
INSTALLATION
5.
Install battery charging gage (4) on control stand
and secure with three screws (7), lockwashers
(6), and nuts (5).
6.
Connect
two
electrical
leads
(3),
two
lockwashers (2), and two nuts (1) to battery
charging gage (4). Remove tags.
3-47